Home > Account Administrator User Manual > 3 ASQ Online for Account Administrators > 3.2 My Profile
3.2 My Profile
You can access your user profile by selecting My Profile from the top navigation menu. Your My Profile page contains four tabbed sections.
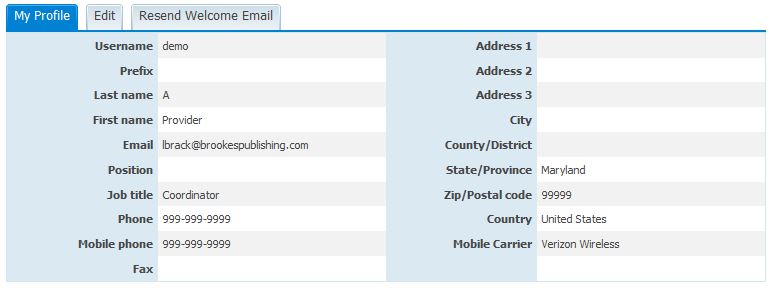
The My Profile section contains your personal information.
The My Notes section is a place for your personal notes pertaining to a number of things within ASQ Online.
The My Files section is a place for your personal files.
And the My Access List section contains a list of the program(s) you have access to, and your role(s) within those programs.
3.2.1 Editing Your Profile
The My Profile section contains your personal information, including your username and password.
To edit any of the fields in the My Profile section:
1. Select My Profile from the top navigation menu.
2. Click the Edit tab to the right of the My Profile tab.
3. Make the desired changes.
4. Click the Save button.
3.2.2 My Notes
The My Notes section allows you to enter and store notes that no one else in the system can access.
To add a note:
1. Select My Profile from the top navigation menu.
2. Click on the Add tab to the right of the My Notes tab.
a. Enter in the "Subject" of the note.
b. Select the "Note type" from the drop-down.
Your choices are: Reminder, Contact Information, Goal, Procedures, and Other.
c. Enter the text of the note in the "Description" text box.
3. Click Save.

3.2.3 My Files
This section allows you to enter and store up to 10 files, no larger than 5MB each, that no one else in the system can access.
To add a file:
1. Select My Profile from the top navigation menu.
2. Scroll down to the My Files section and click the Add tab.
OR
1. Select the Add File Quick Link.
2. Click the Browse button to locate the file you wish to upload, on your computer.
3. Enter in an optional description of the file.
4. Click Save.
You can also download any of your personal files to your computer through the My Files section. For instance, if you uploaded a file and are working on a separate computer, you may wish to download the file so that you can save it to your current computer.
To download a file:
1. Select My Profile from the top navigation menu.
2. Scroll down to the My Files section and click the Download link to the right of the file you would like to download.
3. A pop-up box will appear and you can choose to open this file or save it to your computer.
To edit or delete a file:
1. Select My Profile from the top navigation menu.
2. Scroll down to the My Files section and click on the file you wish to edit or delete.
3. To edit the file, click the Edit tab. Make any changes and then click the Save button.
4. To delete the file, click the Delete tab.

3.2.4 My Access List
This list shows you the programs that you have access to, and what role(s) you have within those programs. To toggle between your user roles, click the View Access link next to the role you wish to switch to. You will then be directed to the Home page of the role you just selected.

3.2.5 My Alerts
As Account Administrator, you have the ability to set up personal alert messages regarding child transfers, which can be sent to yourself via text message or email. These messages will alert you of children being transferred from your account, as well as children being transferred to or from any of your programs. In addition, you can select your preferred time zone that will be used when you set alerts scheduled at a specific time of day.
NOTE: Standard text messaging rates apply to each text message alert received as provided in your wireless rate plan (contact your carrier for pricing plans and details). Email alerts will be subject to standard Internet access and usage charges imposed by your Internet service provider.
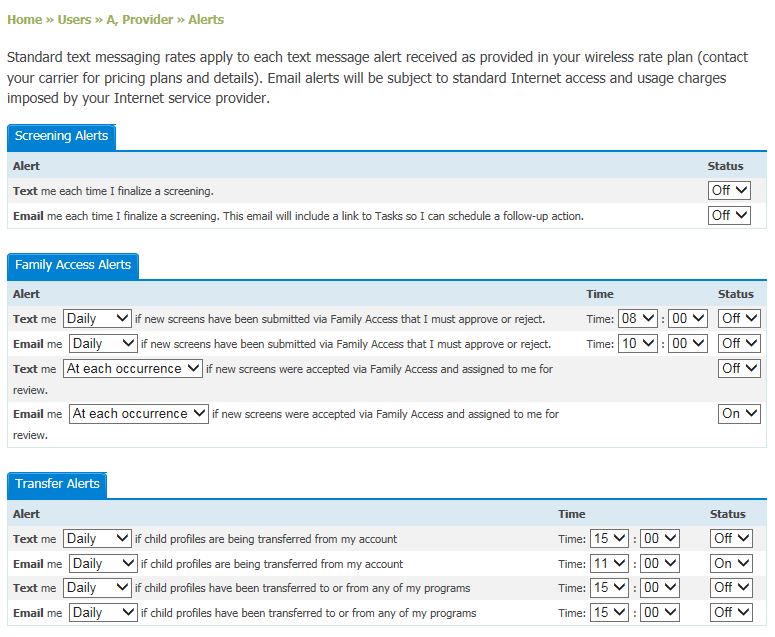
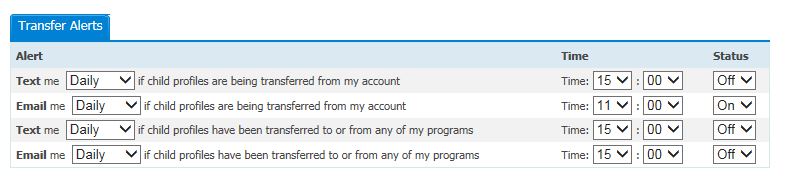
3.2.5.1 Transfer Alerts
To set transfer alerts:
1. Select My Profile from the top navigation menu.
2. Select the My Alerts Quick Link.
3. The Transfer Alerts section has 3 columns: "Alert," "Time," and "Status." You have the option to set a text message alert and an email alert.
a. You
can choose to receive a text and/or email alert if Child Profiles are being
transferred from your account.
b. You
can choose to receive a text and/or email alert if Child Profiles have been
transferred to or from any of your programs.
4. To set an alert:
a. Under
the “Alert” column, select the frequency with which you would like to receive
the text and/or email alerts, from the drop-down menu next to “Text me” or
“Email me.” Your options are: “Daily” or “Weekly.”
b. If
you choose to receive these alerts daily: In the “Time” column, select the time
you wish to receive these alerts, from the drop-down menu.
c. If
you choose to receive these alerts weekly: In the “Time” column, select the day
of the week you wish to receive these messages, from the "Day" drop-down menu.
Then select the time of day you wish to receive these messages, from the "Time"
drop-down menu.
d. To
ensure that you receive these messages, set the status to "On," from the "Status" drop-down menu.
e. Click
the Save Changes button at the bottom
of the page.
NOTE: If you have selected to be alerted via text message, you must have a mobile phone number saved in your profile. If you choose to receive both an email and text message alert, you don't have to receive them both at the same time; you can customize the day and time you wish to receive each one.
3.2.5.2 Time Zone Setting
The Time Zone Setting section is where you can select your preferred time zone for texting and emailing.
To set the time zone:
1. Select My Profile from the top navigation menu.
2. Select the My Alerts Quick Link.
3. Scroll down to the Time Zone Setting section.
4. Select your preferred time zone from the drop-down menu.
5. Click the Save Changes button at the bottom of the page.

See also