3.3 My Alerts
As Program
Administrator, you have the ability to set up personal alert messages regarding
various ASQ Online functions, which can be sent via text message or
email. These messages can be task reminders, Family Access alerts, or transfer
alerts. In addition, you can select your preferred time zone that will be used
when you set alerts scheduled at a specific time of day.
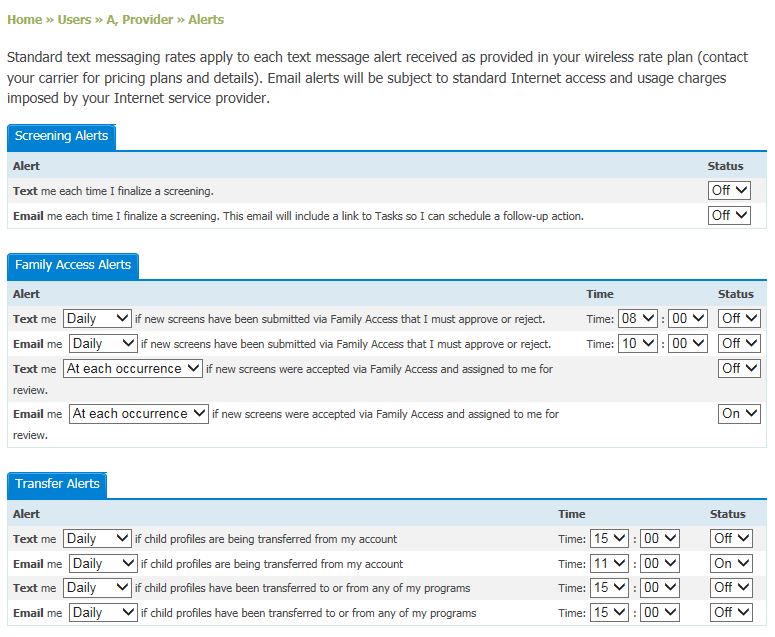
NOTE: Standard text messaging rates apply to each text
message alert received as provided in your wireless rate plan (contact your
carrier for pricing plans and details). Email alerts will be subject to
standard Internet access and usage charges imposed by your Internet service
provider.
3.3.1 Task Reminders
Task reminders alert
you when a task is due. You can choose to have the reminder sent to you via
text, email, or both. When setting a task reminder, you choose the task as well
as when you would like to receive the alert. You may add as many different
combinations of task reminders as you would like.
To set a task reminder
alert:
NOTE: If you have selected to be alerted via text
message, you must have a mobile phone number saved in your profile.

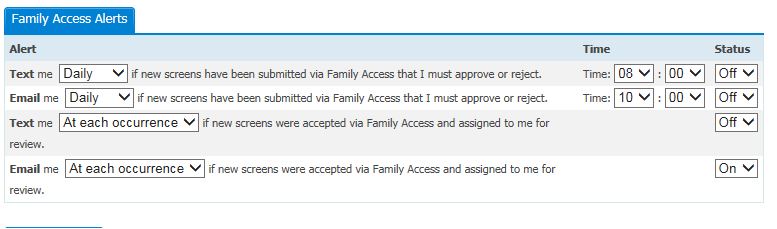
3.3.2 Family Access Alerts
Family Access alerts
allow you to pick a day, time, and frequency that you would like to receive an
alert that a screening has been submitted, via Family Access, to be approved or
rejected. You can choose to receive this alert via text message, email, or
both. Family Access alerts will not alert you each time a screening has been submitted, but will simply alert you
of any screenings that have been submitted according to the specified time
frame you have selected.
For example, if you
select that you would like to receive a text message each day at 10AM, you will
only receive that message once, at 10AM, daily. The message will let you know
how many screenings have been submitted for you to approve or reject, up to
that time. Say that 100 screenings have been submitted. You will not receive
100 alerts; you will receive one alert message informing you that 100
screenings have been submitted.
To set Family Access
alerts:
a. Under the “Alert”
column, select the frequency with which you would like to receive the text
alerts, from the drop-down menu next to “Text me.” Your options are: Daily or
Weekly.
b. If you choose to
receive these text messages daily: In the “Time” column, select the time you
wish to receive these alerts, from the drop-down menu.
c. If you choose to
receive these text messages weekly: In the “Time” column, select the day of the
week you wish to receive these messages, from the “Day” drop-down menu. Then
select the time of day you wish to receive these messages, from the “Time”
drop-down menu.
d. To ensure you receive
these messages, set the status to “On,” from the “Status” drop-down menu.
e. Click the Save Changes button at the bottom.
a. Under the “Alert”
column, select the frequency with which you would like to receive the email alerts,
from the drop-down menu next to “Email me.” Your options are: Daily or Weekly.
b. If you choose to
receive these email messages daily: In the “Time” column, select the time you
wish to receive these alerts, from the drop-down menu.
c. If you choose to receive
these email messages weekly: In the “Time” column, select the day of the week
you wish to receive these messages, from the “Day” drop-down menu. Then select
the time of day you wish to receive these messages, from the “Time” drop-down
menu.
d. To ensure you receive
these messages, set the status to “On,” from the “Status” drop-down menu.
e. Click the Save Changes button at the bottom of the
page.
NOTE: If you choose to receive both an email and text message alert, you don’t have to receive them both at the same time. You can customize the day and time you wish to receive each one.
NOTE: If you have selected to be alerted via text
message, you must have a mobile phone number saved in your profile.
3.3.3 Transfer Alerts
Transfer alerts
notify you when a child has been transferred to or from your program. You can
choose to have the reminder sent to you via text, email, or both.
To set transfer
alerts:
![]()

3.3.4 Time Zone Setting
The Time Zone Setting section is where you can select your preferred time zone for texting and emailing.
To set the time zone:

See also