7.6 Documents
ASQ
Online provides a number of documents to aid you in the screening management of
your program. These documents include the forms found in the ASQ User’s Guides,
as well as other system documents, program documents that the Program
Administrator has created, and personal documents that you have created as a
Provider. Documents are what make up packets, but you can also download and
print any document on its own, without generating a packet.
There
are 3 categories of documents: Screening, Follow-up, and Other.
Screening
documents are all documents that are associated with the screening of children.
Follow-up documents are all documents intended to be used when following up on
a screening with the child’s caregiver. And Other documents are additional
documents that don’t fall into either Screening or Follow-up categories, but
are still helpful to your program.
Below
is a table listing all of the documents provided by ASQ Online, and which
category they fall under.
7.6.1 View/Print
Documents
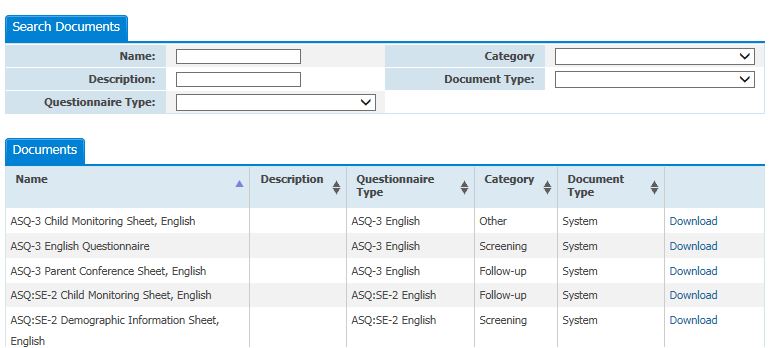
The View/Print Documents page lists all the
system, program, and personal documents, in alphabetical order. The documents
list includes the name, description of the document (for program and personal
documents only), the questionnaire type associated with the document (if
applicable), the category (Screening, Follow-up, or Other), and the document
type (System, Program, or Personal). Each document will also include a Download link, so that you can generate
the document as a PDF file and print it or save it to your computer.
Any
documents that contain dynamic content will have a Download Preview link to the right of the document. Clicking this
will allow you to see what the document will look like when it is generated
with child, caregiver, or program information within a packet, by using fake
data as an example. (For more information on dynamic content, see Section 7.6.2.1 Dynamic Content.)
To
access the View/Print Documents page:
7.6.1.1 Searching for Documents
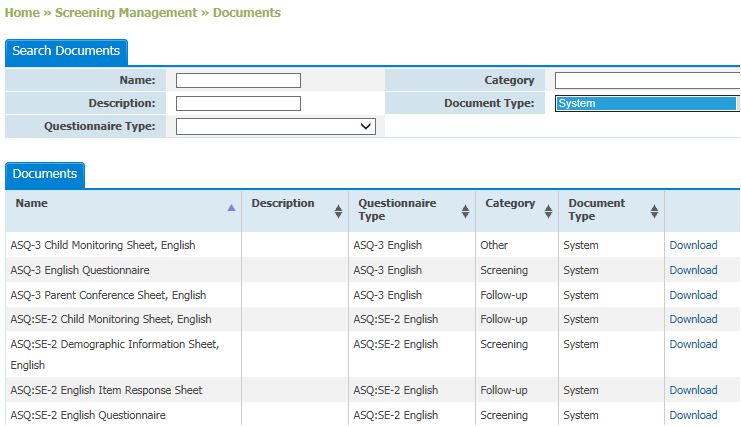
You can quickly and easily search for any document by using the Search
Documents field at the top of the View/Print
Documents page. You can search by the name of the document, the description
of the document (for program and personal documents only), the questionnaire
type, the category, and the document type.
To
search for a document, begin typing in the corresponding field, or select an
option from the drop-down menu, and ASQ Online will automatically pull up
suggestions matching your search options.
7.6.1.2 System Documents
System documents are all documents provided by the ASQ Online system,
including screening and follow-up documents.
To
download a system document:
NOTE: If the document
includes dynamic content, it will have a Download Preview link to the right of the document. This will allow you to preview what
the document will look like when populated with child, caregiver, and program
data. But the download preview will only provide you with fake data. You would
need to generate this document as part of a packet in order to have it populate
with information from your program.
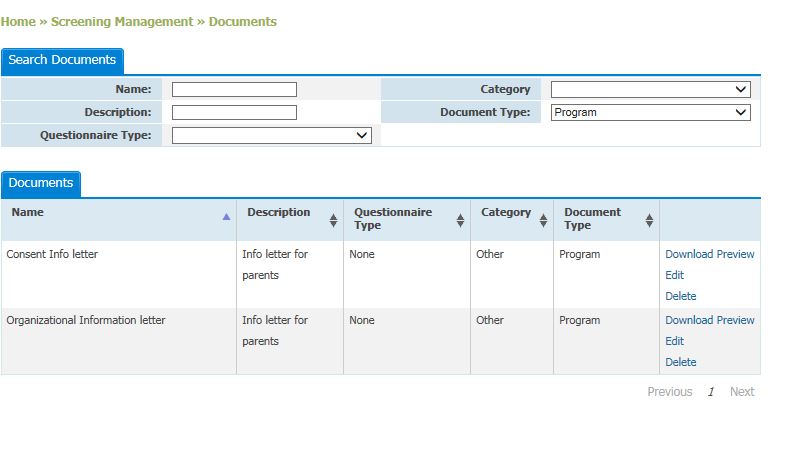
7.6.1.3 Program Documents
Program documents are any documents created by the Program Administrator,
and can be downloaded by all users in the program.
To
download a program document:
NOTE: If the document
includes dynamic content, it will have a Download Preview link to the right of the document. This will allow you to preview what
the document will look like when populated with child, caregiver, and program
data. But the download preview will only provide you with fake data. You would
need to generate this document as part of a packet in order to have it populate
with information from your program.
7.6.1.4 Personal Documents
Personal documents are any documents that you have created as a Provider.
You are the only user in the system that will be able to view and download your
personal documents.
To download a personal document:
NOTE: If the document
includes dynamic content, it will have a Download Preview link to the right of the document. This will allow you to preview what
the document will look like when populated with child, caregiver, and program
data. But the download preview will only provide you with fake data. You would
need to generate this document as part of a packet in order to have it populate
with information from your program.
7.6.2 Creating Documents
As a Provider, you can create your own documents that you can print or
attach to any personal packets. Any documents that you create cannot be viewed
or downloaded by anyone else in the system; you are the only user with access
to your personal documents.
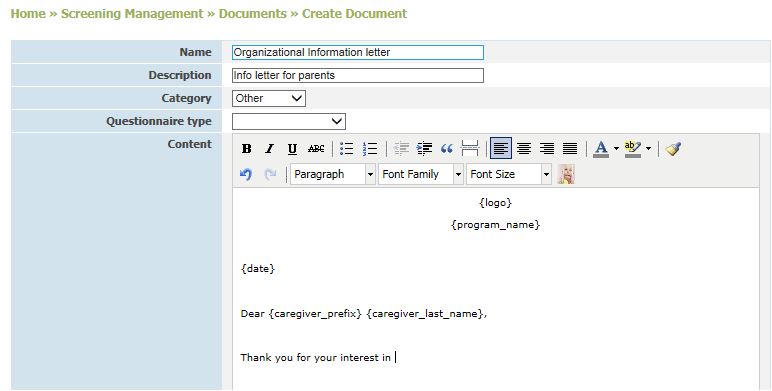
To create a personal document:
This document will now be included on the View/Print documents page and will be listed as a Personal document. You can add this document to any personal packet that you have created.
7.6.2.1 Dynamic Content
Dynamic content is coding that allows you to create documents that can be
easily populated with data that already exists within your ASQ Online program.
For
instance, if you want to send a letter to all caregivers, but you wish to
personalize it to each caregiver, you can use the dynamic content to do so,
without having to individually type in each caregiver’s name.
Dynamic
content can be accessed through the Create
Document page. To view the dynamic content available to you, click the icon
of the baby, within the “Content” field on the Create Document page. A drop-down menu will appear with a list of
all the dynamic content you can use.
To
add dynamic content, select the listed item from the drop-down menu that you
wish to enter into your document. The dynamic content will appear in the
“Content” field as code. Continue typing around the code as if the code were
the actual content that will be pulled from ASQ Online.
Below
is a list of the dynamic content available for inclusion in documents:
Child:
First
Name
Last Name
Address (Address 1, Address 2, Address 3, City, State, Zip)
Phone
Date of Birth
Alt
ID
Child
ID
Caregiver:
Prefix
First Name
Last Name
Address (Address 1, Address 2, Address 3, City, State, Zip)
Phone
Caregiver
email address
Provider:
Prefix
First Name
Last Name
Address (Address 1, Address 2, Address 3, City, State, Zip)
Phone
Job Title
Program:
Name
Address (Address 1, Address 2, Address 3, City, State, Zip)
Phone
Primary Care Physician:
Name
Address (Address 1, Address 2, Address 3, City, State, Zip)
Phone
Date
Logo
7.6.2.2 Dynamic Content
Explained
The
text and coding you enter into the “Content” field can be formatted similarly
to how you would format a document in Microsoft Word. Below is an explanation
of the formatting options:
·
B/I/U - Bold, italicize, or underline a portion of text
·
ABC - Strike through a portion of text
·
![]() - Bulleted or
numbered list
- Bulleted or
numbered list
·
![]() - Decrease or
increase the indent level of a portion of text
- Decrease or
increase the indent level of a portion of text
·
![]() - Format as a block quote
- Format as a block quote
·
![]() - Insert page break
- Insert page break
·
![]() - Align left, align center, align
right, align full
- Align left, align center, align
right, align full
·
![]() - Change text
color
- Change text
color
·
![]() - Highlight portion of text
- Highlight portion of text
·
![]() - Format sections of text
- Format sections of text
·
![]() - Select a font
- Select a font
·
![]() - Select a font size
- Select a font size
·
![]() - Dynamic content (insert code)
- Dynamic content (insert code)

7.6.2.3 View, Edit,
& Delete Personal Documents
To
view, edit, and delete personal documents:
See also