Home > Account Administrator User Manual > 4 Managing Your Account > 4.5 Custom Fields
4.5 Custom Fields
As Account Administrator of an ASQ Online Enterprise account, you have the ability to create custom fields. A custom field is used to capture specific data that you want included in a Child or Caregiver Profile. If there is any child or caregiver-specific information that you want ASQ Online to track, you can use the custom field feature to do so. Once a custom field is created, a Provider or Program Administrator will fill out that information when adding or editing a Child or Caregiver Profile.
Creating custom fields allows your programs to track specific data that you might find useful to report on in the future.
4.5.1 Adding a Custom Field
To add a custom field:
- Select Account from the top navigation menu.
- Scroll down to the Custom Fields tab.
- Click the Add tab next to the Custom Fields tab.
- You will be taken to the New Custom Field page. Fill in the following information (items indicated with an asterisk [*] are required):
a. Location* (Choose whether this field will appear on a Child or Caregiver Profile)
b. Label* (This will be the name of the custom field)
c. Spanish Label (This is the spanish translation of the Label that will appear in the Spanish version of your Family Access pages if you have a Spanish Family Access URL.)
d. Required* (Indicate whether or not you want this custom field to be a required field within a Child or Caregiver Profile)
e. Include in Family Access* (Indicate whether or not you want this custom field to appear in Family Access. All required fields must appear in Family Access.)
f. Data Type* (Choose the type of custom field you would like. Your options are: Text, Drop-down menu, Date, or Yes/No)
g. Format (If you choose "Text" or "Drop-down menu" as your data type, you can format how would like this data to be entered) NOTE: If you are creating a drop-down menu custom field, Format becomes a required field. You will need to enter the options that you wish to appear in your drop-down menu. You will also need to indicate whether you will allow users to select more than one option from the drop-down menu, by selecting "Yes" or "No" next to "Multiple selections allowed."
h. Default value (Allow a default value for the custom field appear automatically.)
i. Example (Provide example text to help a user to better understand the type of information that should appear in the field.)
j. Spanish Example (This will include the Spanish translation of the Example field. If filled in, this will appear in the Spanish version of your Family Access pages if you have a Spanish Family Access URL.)
k. Position (Enter in numbers 1, 2, 3...etc., to determine the order of the custom fields. The custom fields start to appear after the last child profile/caregiver profile field.)
l. Description (Enter in a description of the field to help the user understand the reason for completing the field.)
m. Spanish Description (This will include the Spanish translation of the Description field. If filled in, this will appear in the Spanish version of your Family Access pages if you have a Spanish Family Access URL.)
5. When you have finished entering the information, click the Save button.
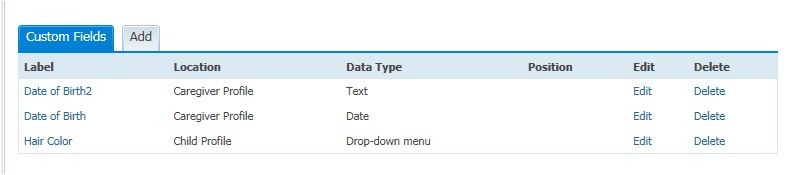
4.5.2 Viewing a Custom Field
To view a custom field that has been created:
- Select Account from the top navigation menu.
- Scroll down to the Custom Fields tab.
- Any custom fields that have been created will be listed here.
- Click on the name of the label of the custom field to view the details of that custom field.
4.5.3 Editing a Custom Field
To edit a custom field that has been created:
- Select Account from the top navigation menu.
- Scroll down to the Custom Fields tab.
- Click Edit next to the name of the custom field you would like to edit.
- You will be taken to the Edit Custom Field page where you can make your desired changes. (NOTE: Any area that is grayed out on this page cannot be edited, since a change to that area would delete any previously entered data in this custom field.)
- Click the Save button.
4.5.4 Deleting a Custom Field
To delete a custom field that has been created:
- Select Account from the top navigation menu.
- Scroll down to the Custom Fields tab.
- Click Delete next to the name of the custom field you would like to delete.
- A pop-up message will appear saying, "By deleting a custom field, you will also be permanently deleting all custom field data that has been entered for a child or caregiver. Are you sure you want to delete this custom field?"
- Click OK.
See also