Home > Program Administrator User Manual > 6 Managing Child Profiles > 6.7 Viewing Tasks

6.7 Viewing Tasks

Within ASQ Online, you can schedule screening and non-screening tasks (such as follow-up actions), for the children in your program. These tasks help you to manage and better serve the children in your program. The Screening Management page is where you can add and keep track of all tasks, but you can also add and view a child’s tasks within their profile. (For more information on tasks, see Section 10 Screening Management.)

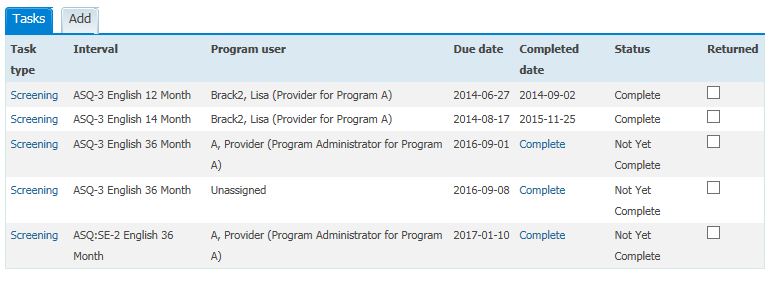
To view a child’s tasks within their profile:


  1. Click the View All tab to the right of the Child Profiles tab on your Home page.

OR

  1. Select Child Profiles from the top navigation menu.
  2. Browse the Child Profiles list or search for a Child Profile.
  3. Click on the child’s name to access his or her profile. 
  4. Scroll down to the tasks section. The child’s first 5 tasks will be listed here. Click the View All tab to view a list of all tasks for this child.
  5. To view the details of an individual task, click on the task type. From the Task Details page you can edit or delete this child’s task.


6.7.1 Adding Tasks via the Child Profile


To add a task from a child’s profile:


  1. Select Child Profiles from the top navigation menu.
  2. Browse the Child Profiles list or search for a Child Profile.
  3. Click on the child’s name to access his or her profile.
  4. Scroll down to the tasks section and click the Add tab, or click Add Task from the Quick Links menu.
  5. Enter in the following information (items marked with an asterisk [*] are required):
    1. Task type* (Select the screening or non-screening task from the drop-down menu.)
    2. Program user* (The Program Administrator or Provider responsible for this child.)
    3. Due date*
    4. Completed date (If you are creating this task after the task has been completed, for tracking and reporting purposes.)
    5. Description


NOTE: If you select a screening task, you will need to also select the questionnaire type and interval (ASQ Online will recommend an interval). You can also enter a “Returned date” if you are creating this screening task after the screening has been completed, for tracking and reporting purposes.


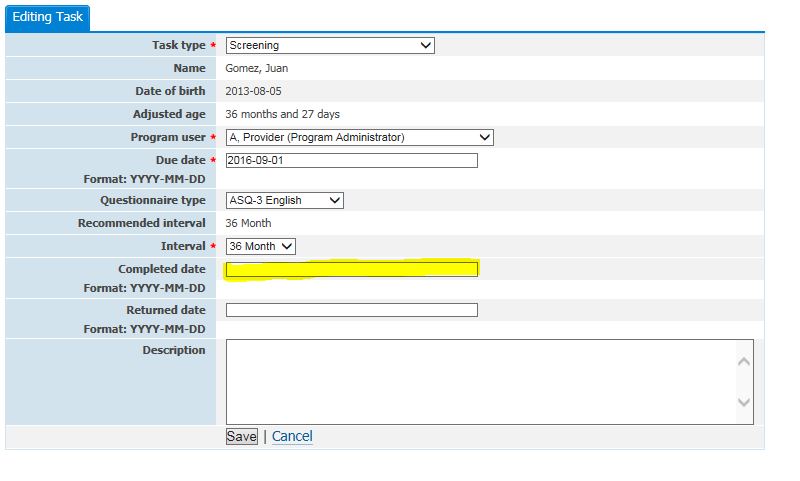
6.7.1 Adding Tasks via Screening Management

To add a task from Screening Management:


  1. Click Schedule Screening from Quick Links menu to add a screening task and click Add Task to add a non-screening task.
  2. Enter in the following information (items marked with an asterisk [*] are required):
a. Task type* (Select the screening or non-screening task from the drop-down menu.)
b. Child name* (Select the child name from the drop-down menu.)
c. Program user* (The Program Administrator or Provider responsible for this child.
d. Due date* (Format:  YYYY/MM/YY)
e. Questionnare Type (This field appears if you are adding a screening task.)
f. Recommended Interval (This field appears if you are adding a screening task.  It will be autofilled by the system.
g.  Interval (This field appears if you are adding a screening task.  It will be autofilled by the system.) 
h. Completed date (Format:  YYYY/MM/DD)  (If you are creating this task after the task has been completed, for tracking and reporting purposes.  Screening tasks will be automatically completed if you print the Questionnaire from the Screening Management section.)
i. Returned date (Format:  YYYY/MM/DD)  (This field appears for Screening tasks.  Once a screening is finalized/accepted through Family Access into ASQ Online, the system will automatically mark the task Returned that is associated with the finalized screening.)
j. Description


6.7.2 Manually Completing Tasks & Marking Tasks “Returned”


There may be instances when you create a task within ASQ Online after the corresponding action has already been completed. For instance, you might create a screening task for a child, for a screening that has already been entered into the system. One reason you might do this is if you are using tasks for tracking and reporting purposes but forgot to create the task until after it was complete.


If this is the case, you can manually complete the task within the child’s profile. If it is a screening task, you can also manually mark the screening as “Returned.” (“Returned” refers to screenings that were mailed to the caregiver and have been sent back to your program, to be entered into ASQ Online.) For more information, see Section 9.3.4 Screening Tasks Completed and Section 9.4.3 Tasks Completed.


To manually complete a task from the child profile:


  1. Select Child Profiles from the top navigation menu.
  2. Browse the Child Profiles list or search for a Child Profile.
  3. Click on the child’s name to access his or her profile.
  4. Scroll down to the Tasks section. The list of tasks will include the task type, the interval (if it’s a screening task), the program user responsible for the child, the due date, the completed date, the status, and a “Returned” column.
  5. If the task is not yet complete, “Not Yet Complete” will be listed under the “Status” column.
  6. To manually complete the task, click the Complete link, under the “Completed date” column.


To manually mark a screening task as “Returned” from the child profile:


7.      If the task is a screening task, there will be a check box under the “Returned” column.

8.      To mark the task as “Returned,” put a check mark in the box. 


To manually complete a screening or non-screening task from Screening Management:

1. Click on Screenings Due Quick Link for screenings task or Tasks Due Quick link for non-screening tasks.
2. Locate the task and click the Edit link to the right of the task.
3. If the task is not yet complete, the "Completed date" field will be empty.
4. Enter the completed date in the “Completed date” field using date format YYYY/MM/DD.
5. Click Save.


To manually mark a screening task as "Returned" from Screening Management:

1. Click on Screenings Due Quick Link
2. Locate the Screening task and click the Edit link to the right of the task.
3. T
here will be a check box under the “Returned” column.
4. To mark the task as “Returned,” put a check mark in the box.
5. Click Save.


See also

6.1 Adding a Child Profile
6.2 Searching for a Child Profile
6.3 Viewing the Child Profiles List
6.4 Viewing & Editing Child Profile Details
6.5 Archiving or Deleting a Child Profile
6.6 Child Profile Screenings
6.8 Adding & Viewing Child Profile Notes
6.9 Caregivers
6.10 Child's Providers & Reviewers
6.11 Merging Child Profiles
6.12 Viewing a Child's Transfer History
6.13 Requesting Child Transfers (Pro account only)